Categories
About
categories
What
are Categories
Categories are words or phrases that you can define and use to keep track of related messages. When you add the same category to more than one message they are displayed together in an auto-created category folder in Categories view.
Many people use Outlook folders to organize messages by project or topic, but categories are much better because you can assign more than one category to a message (something you can't do with Outlook folders unless you copy the message). You can continue to file messages to Outlook folders - categorized messages display together regardless of the folder they are filed in.
NEO
categories are Outlook categories
If you set a category for a message in NEO, it appears for the same message in Outlook and vice versa. NEO and Outlook categories are one and the same. For additional information about categories and how they are used in Outlook, see Outlook's Help.
How
NEO categories are different
NEO's categories look like Outlook categories but there are important differences in how they behave:
|
Category folders |
NEO categories are stored in Category folders. Click a folder in Category view to see the messages in it, or make it Hot. |
|
Easier to manage |
When you edit a category, the category itself is also edited in all the messages - you can easily edit, split and merge your categories. NEO categories have referential integrity! |
|
Easier to organize |
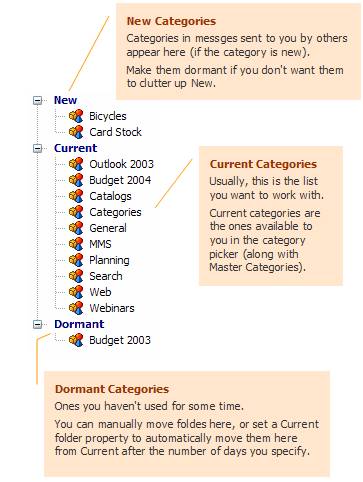
In Category view, category folders are auto-organized into New, Current and Dormant top-level folders. You can also add your own Group folders for further organization. |
|
Easy to set |
The categories "picker" |
Categories
and Outlook 2007
With Outlook 2007 Microsoft introduced color-coded categories. In fact they moved from using colored flags to colored categories. Flags within Outlook 2007 are now used exclusively to set Follow-Up reminders and their color (which only comes in variants of ‘red’) is fixed based on the timing of the Follow-Up.
NEO use the same categories as Outlook which assigns the color. When adding a new category either within NEO or Outlook, the category becomes visible in both. Category colors can be managed using Outlook.
In addition to categories NEO continues to provide the Flags in the different colors as under Outlook 2003 to maintain compatibility and to provide additional flexibility for users to define their own meaning for the flags they set as Follow-Up or as Reminder.
Import/Export
Categories 
To be able to manage category lists across multiple machines, NEO Pro provides Import/Export functionality for Categories. Using a semicolon separated CSV file, categories can be exported for use on other machines where they can be imported again using NEO. These CSV files can also edited manually before importing into NEO/Outlook again. Import/Export Categories is available on the Application Button menu. Non-registered users cannot import and can export max. 5 categories.
Categories in
Category view
The categories in Category view are those to which you have assigned messages. You can also create empty categories and assign messages to them later.
Categories are organized into New, Current and Dormant top-level folders to make them easier to work with.
There's no notion of Master Categories in Category view. The Master Category List is just for picking categories in the catalog picker (use of it is optional).
Master
and user-defined categories
In NEO, the categories you assign may be ones you define, or they may be ones you pick from the Master Category List.
To maintain consistency between the category lists in NEO and Outlook, it’s best to add all categories to the Master Category List.
Master categories
There's really nothing complicated about master categories or the Master Categories List. The "list" is simply a list of categories stored in your registry or PST. Outlook delivers a list to get you going, but you can and should improve on it if you plan to use Master Categories at all.
At best the Master Categories List serves as a pick list from which to choose regularly occurring categories.
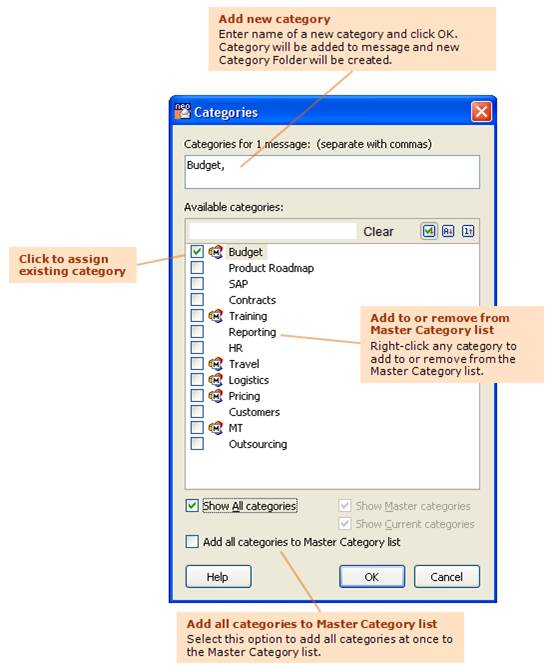
When you select ‘Add All Categories to Master Category List’ in
NEO’s Category Picker (Ctrl+T), all current and new
categories will automatically be added to the Master Category List.
User-defined
categories
There is no limit to the number of categories you can add, which makes them ideal for organizing your projects and activities. You can add your own categories to the Master Category List if you like.
Ways to set
categories
Using
the Category Picker
There are several ways to access the category picker.
·
Click ![]() on the Toolbar.
on the Toolbar.
· Right-click and choose Categorize with message(s) selected.
· Press Ctrl+T or Alt+Z with message(s) selected.
·
Click ![]() in the Reading
Pane (current message only)
in the Reading
Pane (current message only)
Using
the Reading
Pane Categories field
· Click into the field Categories - separate each with commas (current message only)
· Press Shift+Ctrl+T (current message only)
Drag
to a Category folder
You
can drag one or more messages to a category folder. You can undock the Category
view to make it more accessible, or you can make popular category folders Hot
for easier access
Assigning categories
using NEO Rules
Incoming messages can be automatically assigned a category based on (part of) the subject using a rule.
To create a new rule, select Rules from the Tools menu. This will open following dialog screen. With multiple rules defined, the Rules window can be resized in height or sorting can be applied to any column.
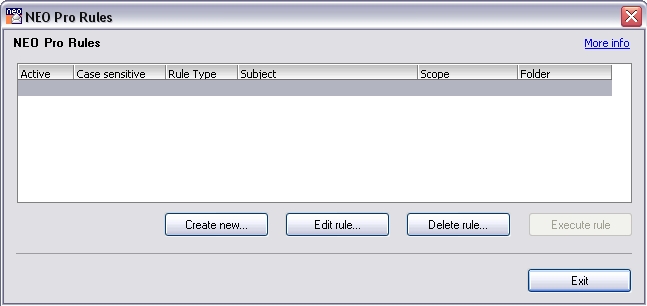
To create a new category rule or edit an existing one, click “Create new…” or “Edit rule…” and click Category:
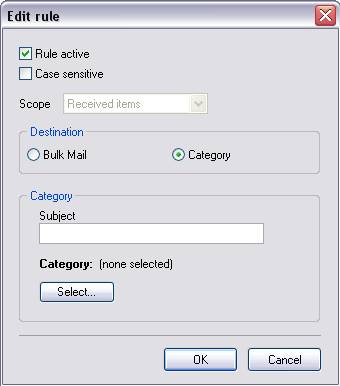
Rules can be kept in the system without being executed by deselecting the “Rule Active” mark.
“Case sensitive” can be used to limit the rule only to the exact string provided under Subject matching the upper/lower case characters.
Under “Subject” the words to be looked for in the subject are entered. This can be a single word, several words or the entire subject.
Finally a category needs to be assigned. This is done by clicking ‘Select’ and picking a category from the list.
Click OK when finished or Cancel to exit.
Assigning
categories using the category picker
With a message selected click Ctrl+T or Alt+Z to open the category picker. The category picker lets you choose categories quickly while providing information you need to help you keep your categories in good shape. You can choose to work with Master Categories, with your Current categories from Category view, or both together.
Using
Categories
Editing,
removing, deleting, merging, splitting, etc.
Remove
categories from messages
· Use the category picker and uncheck the categories (or delete from top area)
· Clear the categories from the Categories field in the Reading Pane.
Remove
category from messages and remove category folder
· Right-click the Category folder and choose Remove Folder (or press Alt+Del).
Important: Do not choose Delete Folder (Del) because this will delete the messages themselves in addition to removing the categories from the messages.
Edit
a category
· Right-click the Category folder and choose Rename Folder (or press F2). Note that this will also rename the categories in all of the messages in which it belongs.
Create
an empty category folder
· Right-click the area you want to create the folder in (New, Current, Dormant), and choose New Folder (or press Shift+Ctrl+E).
Combine
two categories
· Right-click the Category folder and choose Combine Folder. Alternatively, you can drag the folder you don’t want and drop it onto the folder you want to keep.
Split
a category folder
· Create a new category folder, then drag the messages from the source folder to the new one.
Moving
category folders between New, Current and Dormant
·
You can manually move category folders by dragging and dropping
them on the New, Current or Dormant folder respectively.
You can also use the right-click Make Current and Make Dormant commands.
· You can automatically move category folders by setting options on the Folder Properties (right-click any of the New, Current or Dormant top-level folders).
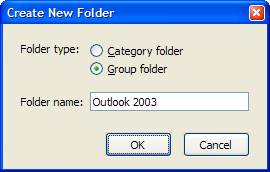
Creating
category folder groups
For added organization, you can choose to organize your category folders into groups.
To add a group folder, right-click where you want the folder group to appear and choose New Folder. Then create the folder:
Category
Folder List with sample groups defined
